For an introduction to what the Provisioning hub does and how the plan/apply model works, see the Resource Provisioning overview.

Prerequisites


Step 1: Build the Inventory

Navigate to Provisioning in the left sidebar. The Resource Catalog opens on the Inventory tab.
Importing resources into the inventory via CSV
Click Add to Inventory. You can enter resources manually or upload a CSV file. The wizard previews the rows before importing, flagging new additions, updates, and unchanged entries. The CSV must use the following format:
name,type,host,port
analytics,PostgreSQL,192.168.18.54,5432
marketplace,PostgreSQL,192.168.18.54,5432
Once imported, the Inventory tab lists every resource with its current Setup progress (a three-step bar: Inventory → Manage → Provision).
Inventory tab showing two resources with 1/3 setup progress

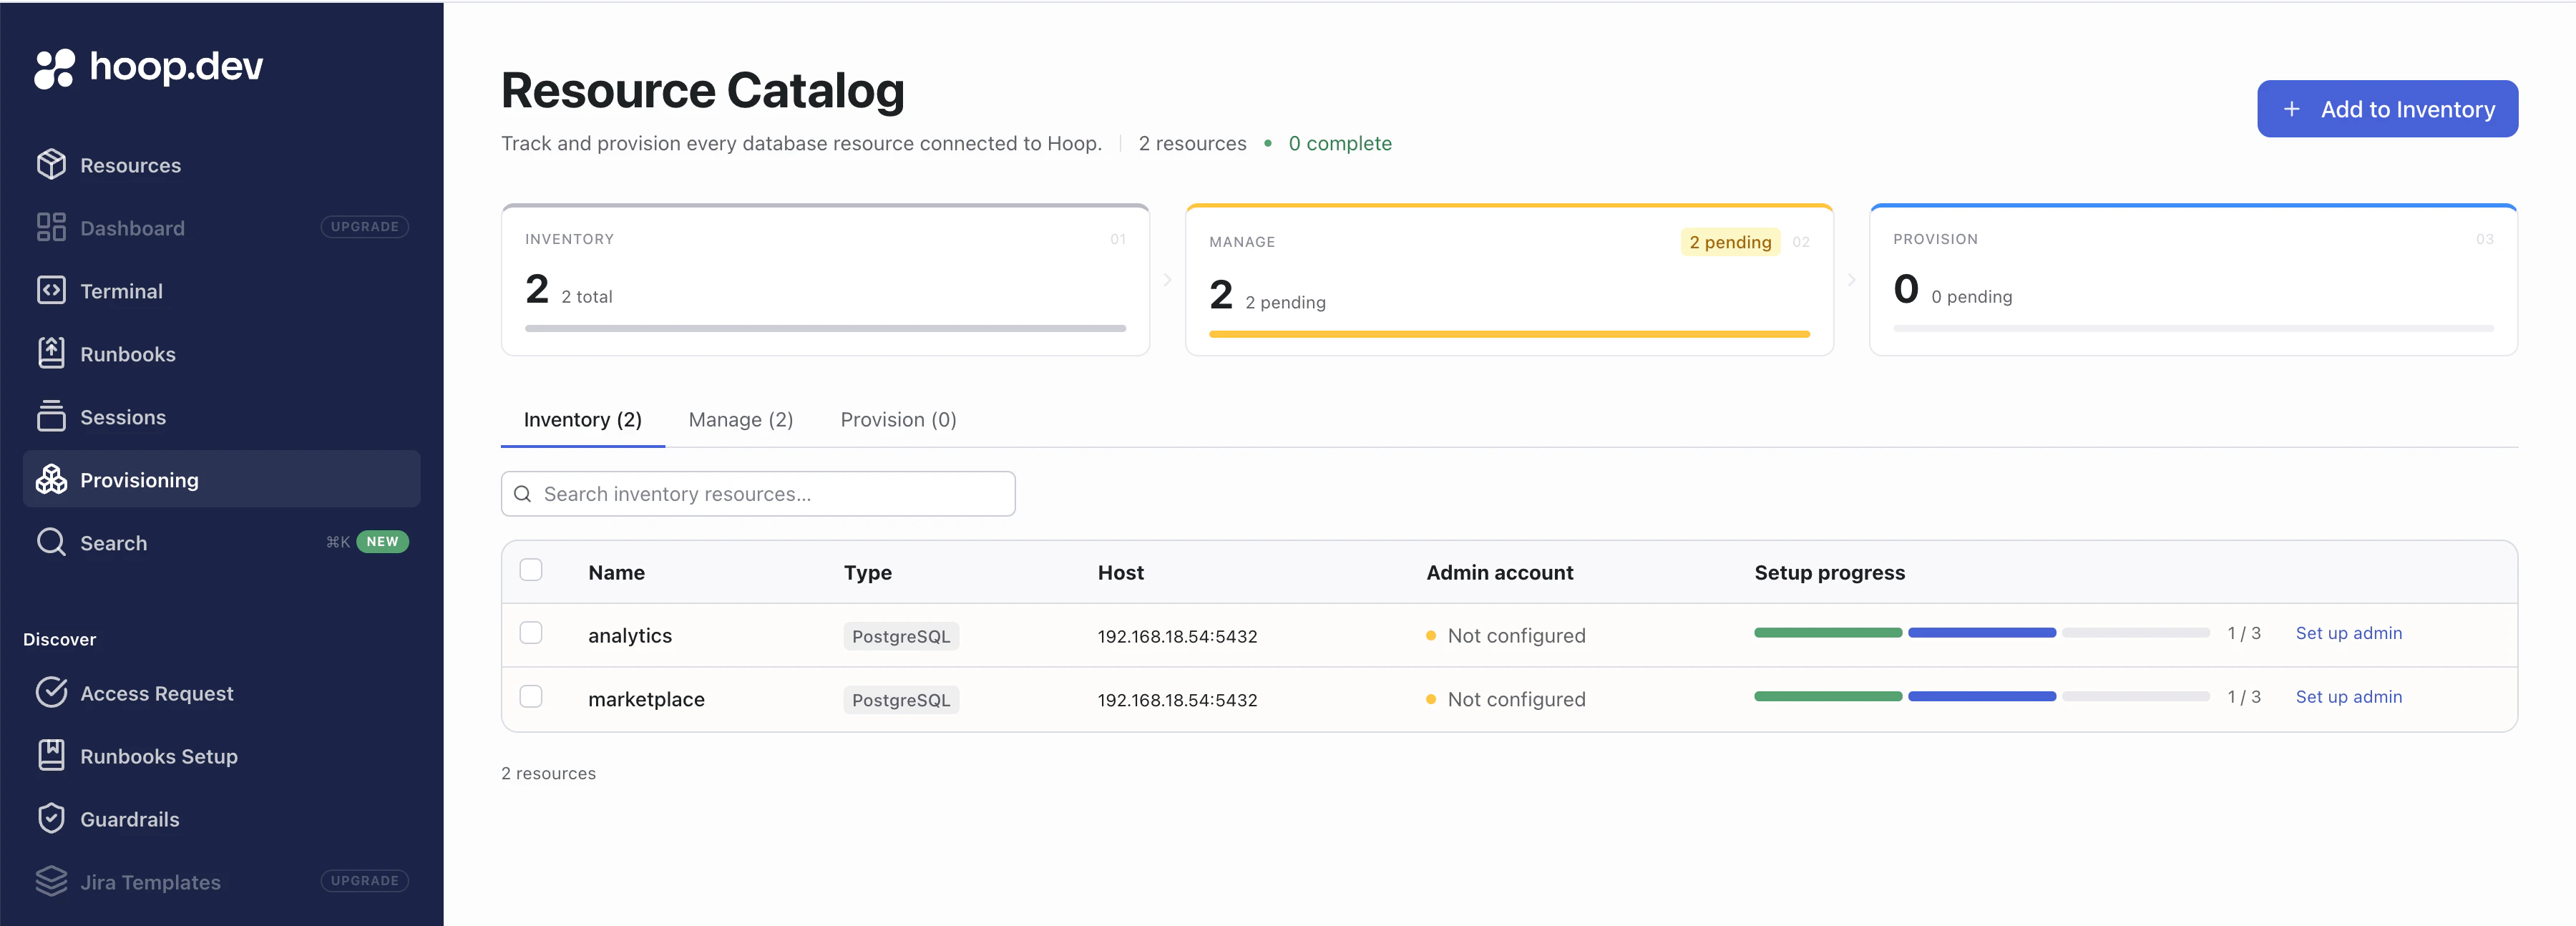
Step 2: Configure Admin Accounts

After import, the Manage funnel counter shows how many resources still need admin credentials. Click Set up admin next to any resource (or select multiple and use the bulk action bar) to open the admin account editor.
Manage admin accounts page with username and password fields
Enter the Admin user (typically 
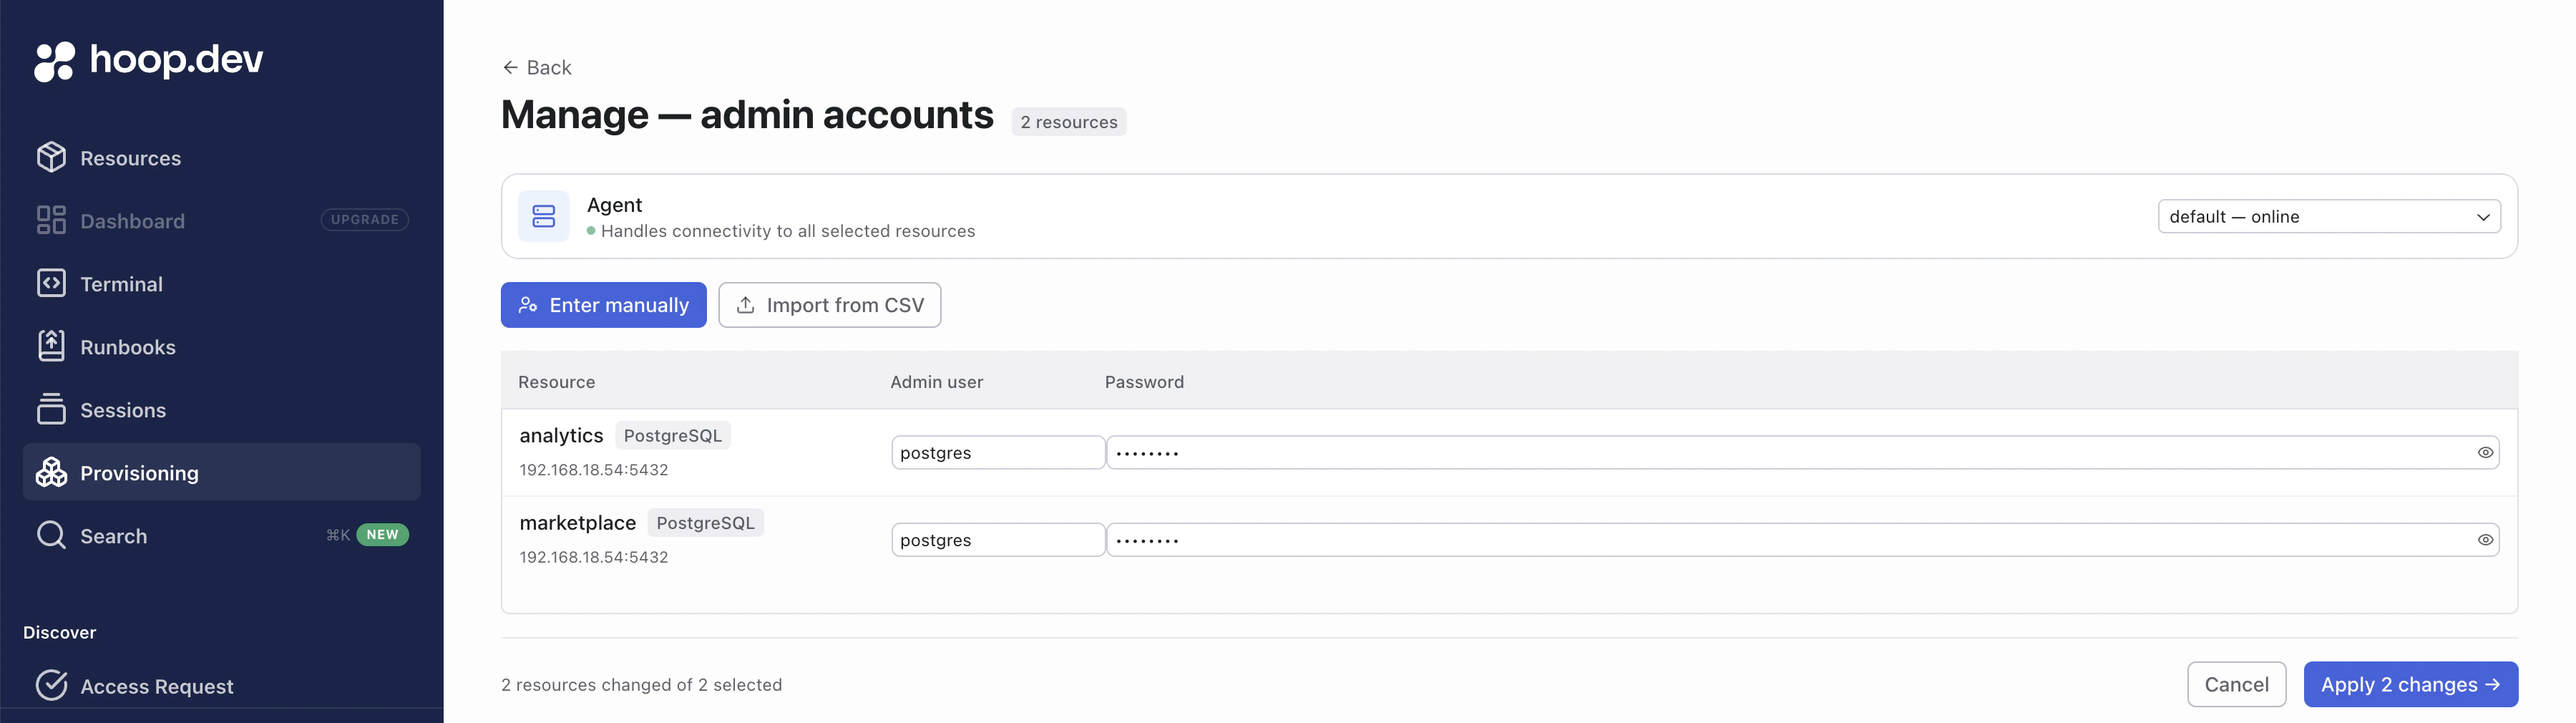
postgres or another superuser) and the corresponding Password for each resource. You can also import credentials from a CSV if you’re configuring many resources at once. Select the Agent that has network access to the databases — the dropdown shows all online agents. Click Apply changes to save. Hoop validates connectivity before storing the credentials. Once every resource has credentials, the Manage counter drops to zero and the Provision counter shows the pending count.

Step 3: Provision Roles

Open the Provision tab. Resources that have admin credentials but no provisioned roles appear here.
Provision tab showing 2 pending resources
You can configure roles in two ways:

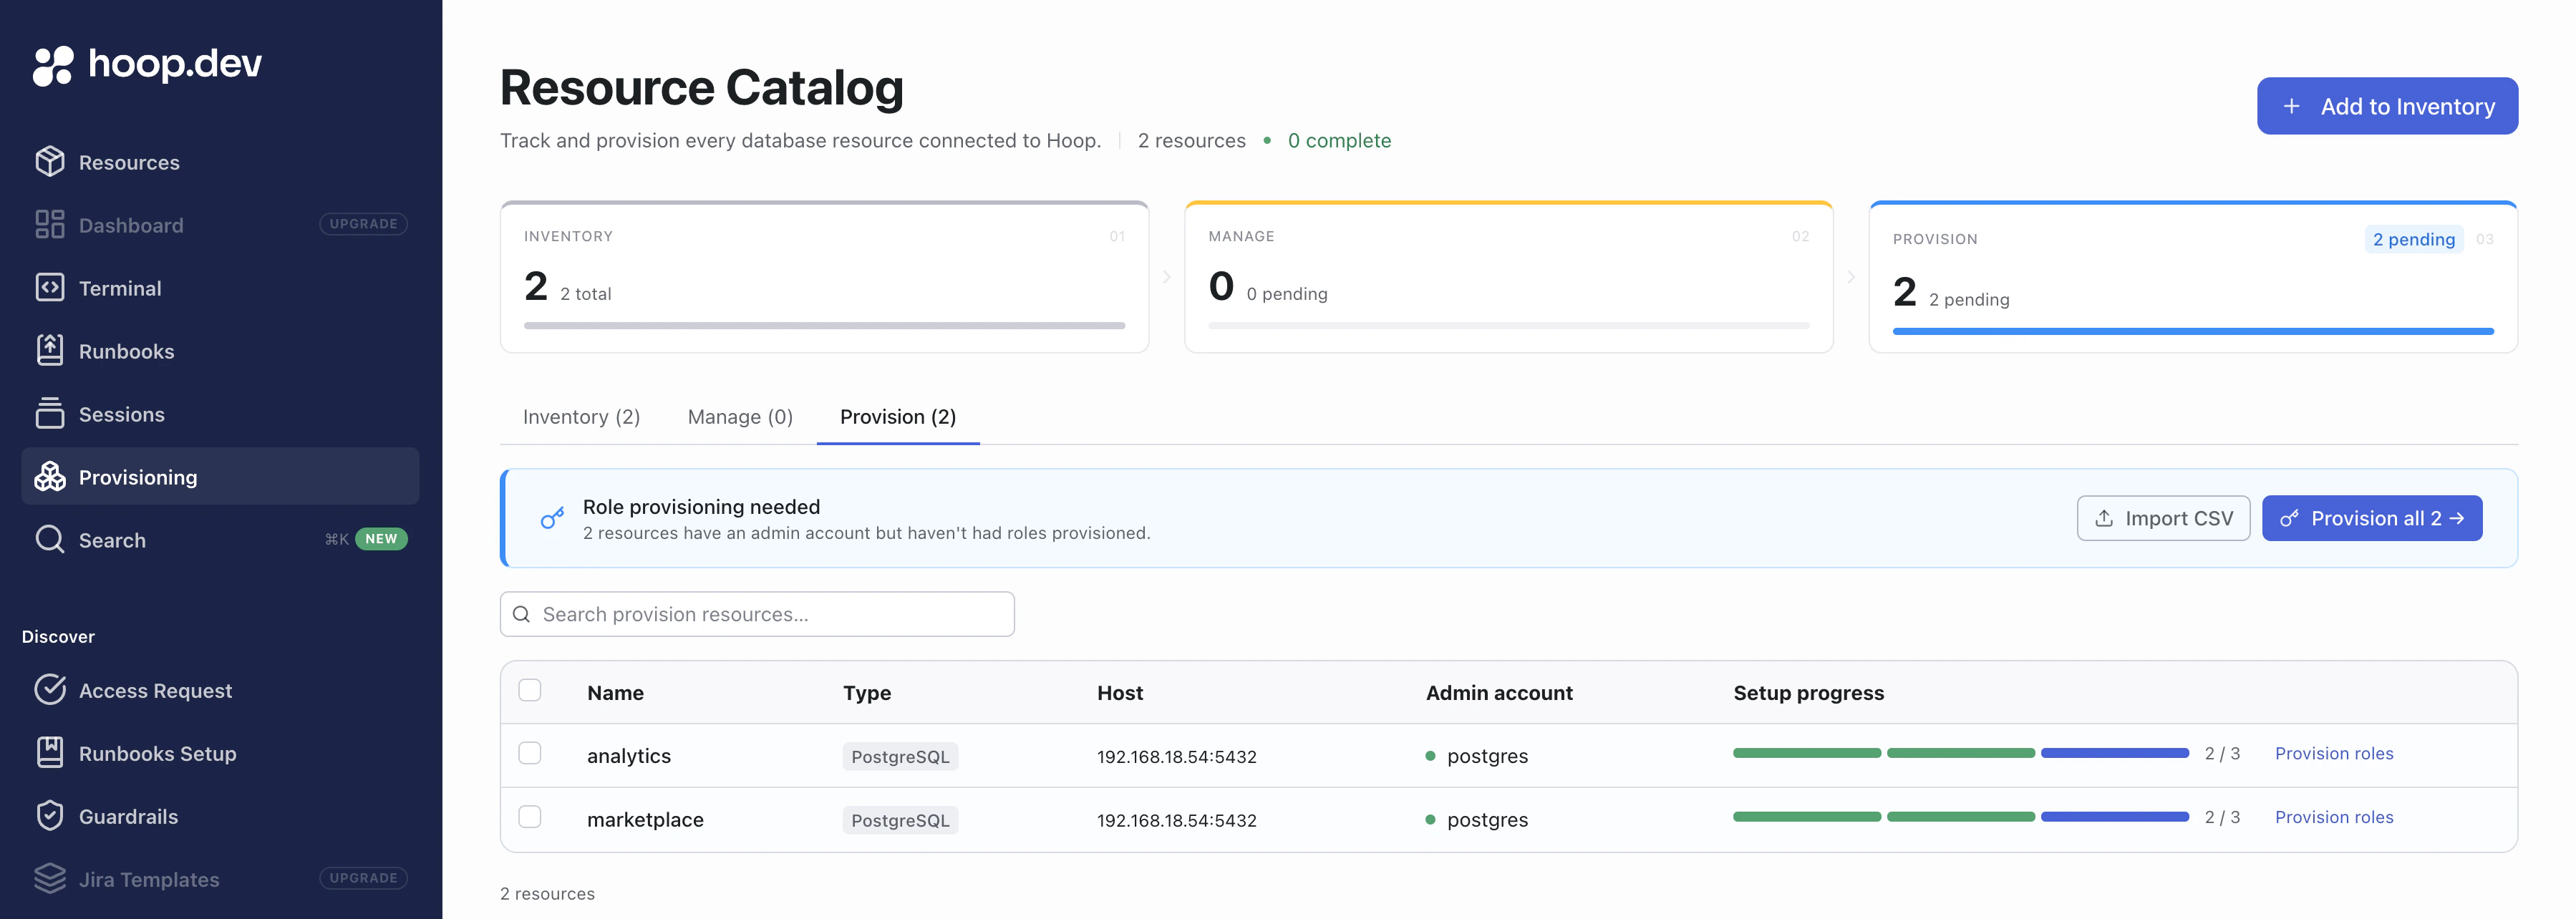
Option A: Import from CSV

Click Import CSV to upload a role definition file. Each row defines one role:
resource_name,type,role,scopes,permissions,source_role
analytics,managed,ro,analytics.public;legacy;app,SELECT,
analytics,managed,rw,analytics,SELECT;INSERT;UPDATE,
marketplace,external,ro,,,pg_read_all_data
ColumnDescription
resource_nameName of the resource in the inventory
typemanaged or external
roleShort label appended to the generated role name (e.g. rohoopdev_analytics_ro_<hash>)
scopesSemicolon-separated scopes for managed roles. Use database to target all schemas or database.schema for a specific schema (e.g. analytics.public;legacy;app)
permissionsSemicolon-separated Postgres privileges for managed roles (e.g. SELECT or SELECT;INSERT;UPDATE)
source_roleExisting Postgres role to inherit from — used only with external type

Option B: Provision roles individually

Click Provision roles next to a specific resource to open the role configuration wizard for that resource.

Running the Plan

After configuring your roles, click Provision all (or select individual resources and click Provision roles). Hoop runs a dry-run plan — it connects to each Postgres cluster, inspects the live catalog state, and computes the exact SQL statements needed.
Provision screen showing 3 roles in Plan ready state
Each role appears with:
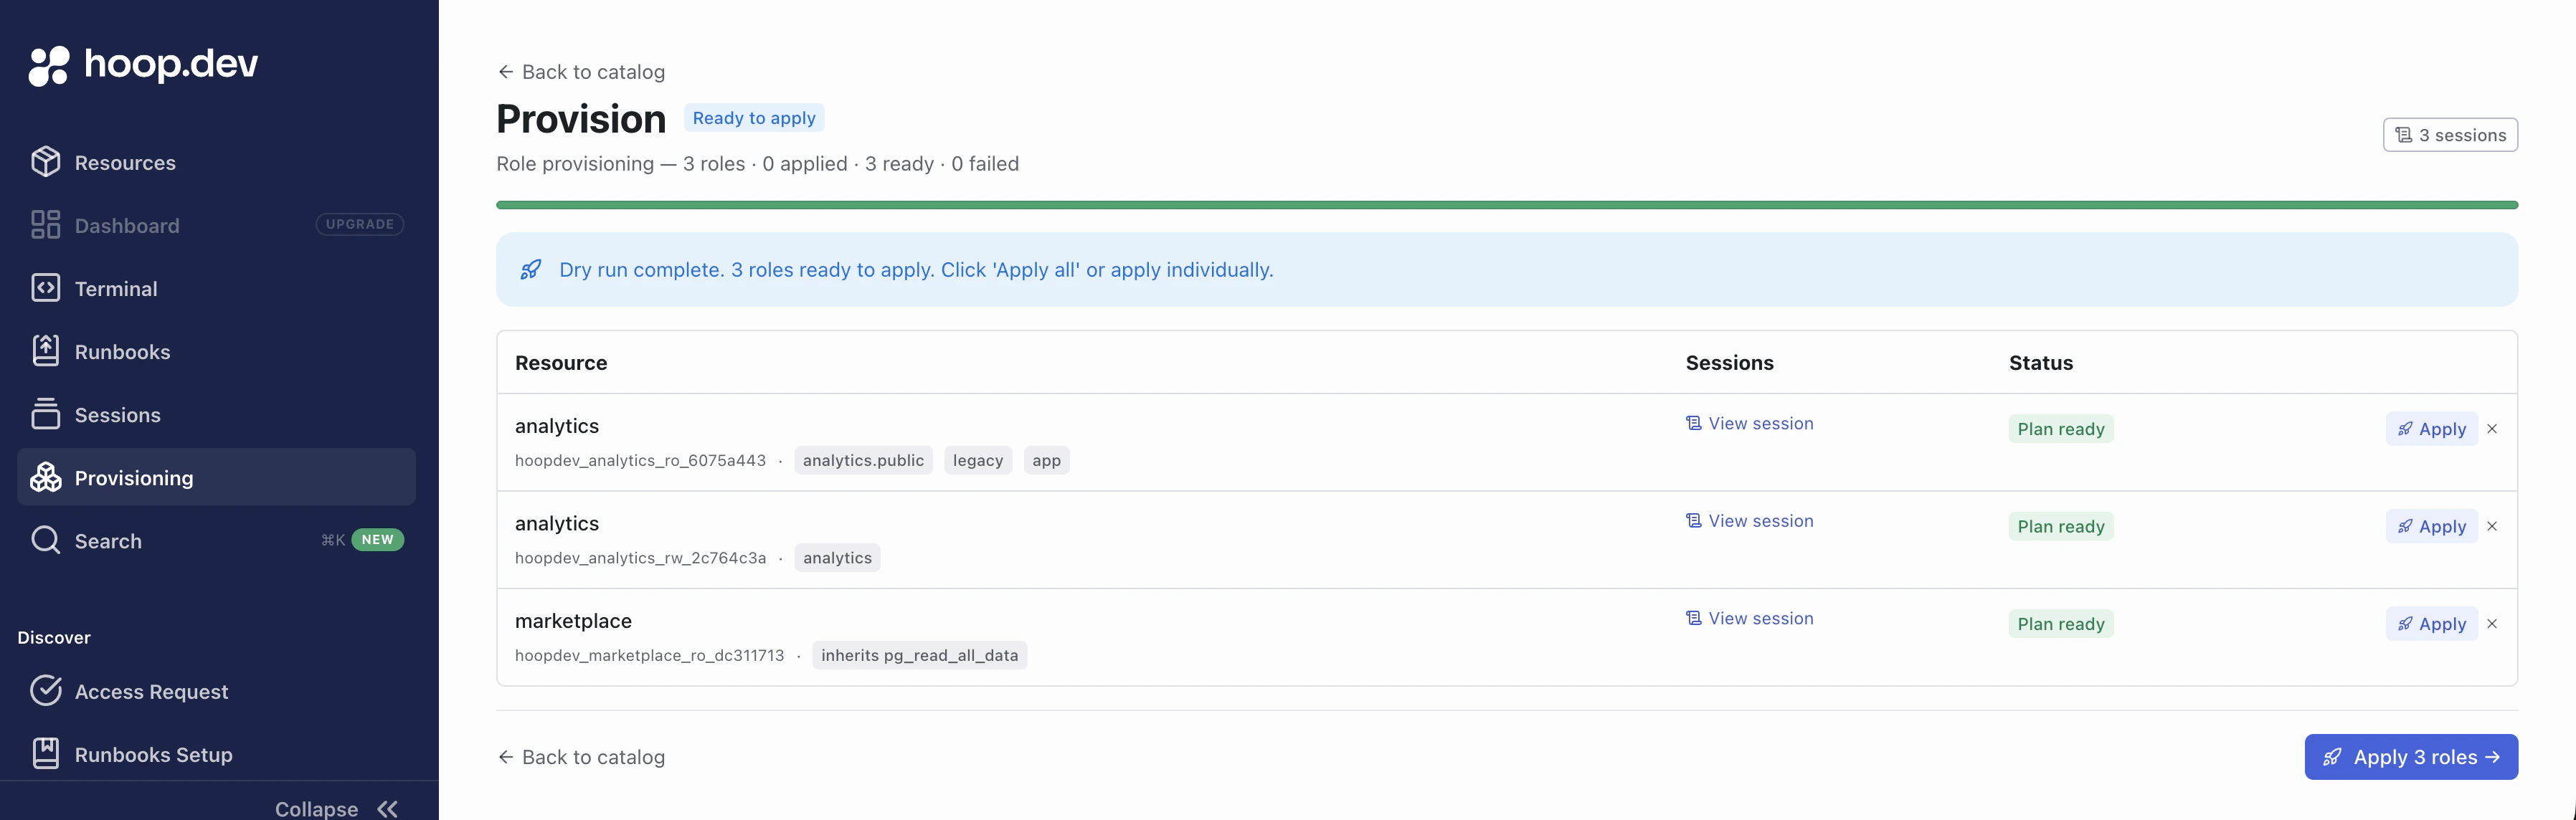
  • The generated role name (e.g. hoopdev_analytics_ro_6079a443)
  • The target scopes or inherited role
  • A View session link to inspect the full plan output
  • Plan ready status — meaning the plan computed successfully and is safe to apply
Role names follow the pattern hoopdev_<resource>_<label>_<8-char-hash>. The hash is derived from the role configuration and keeps names unique and deterministic while staying within Postgres’ 63-byte identifier limit.

Applying the Plan

Review the plan sessions to confirm the SQL looks correct. When satisfied, click Apply on individual roles or Apply N roles to apply all at once. Hoop executes the SQL against each Postgres cluster.
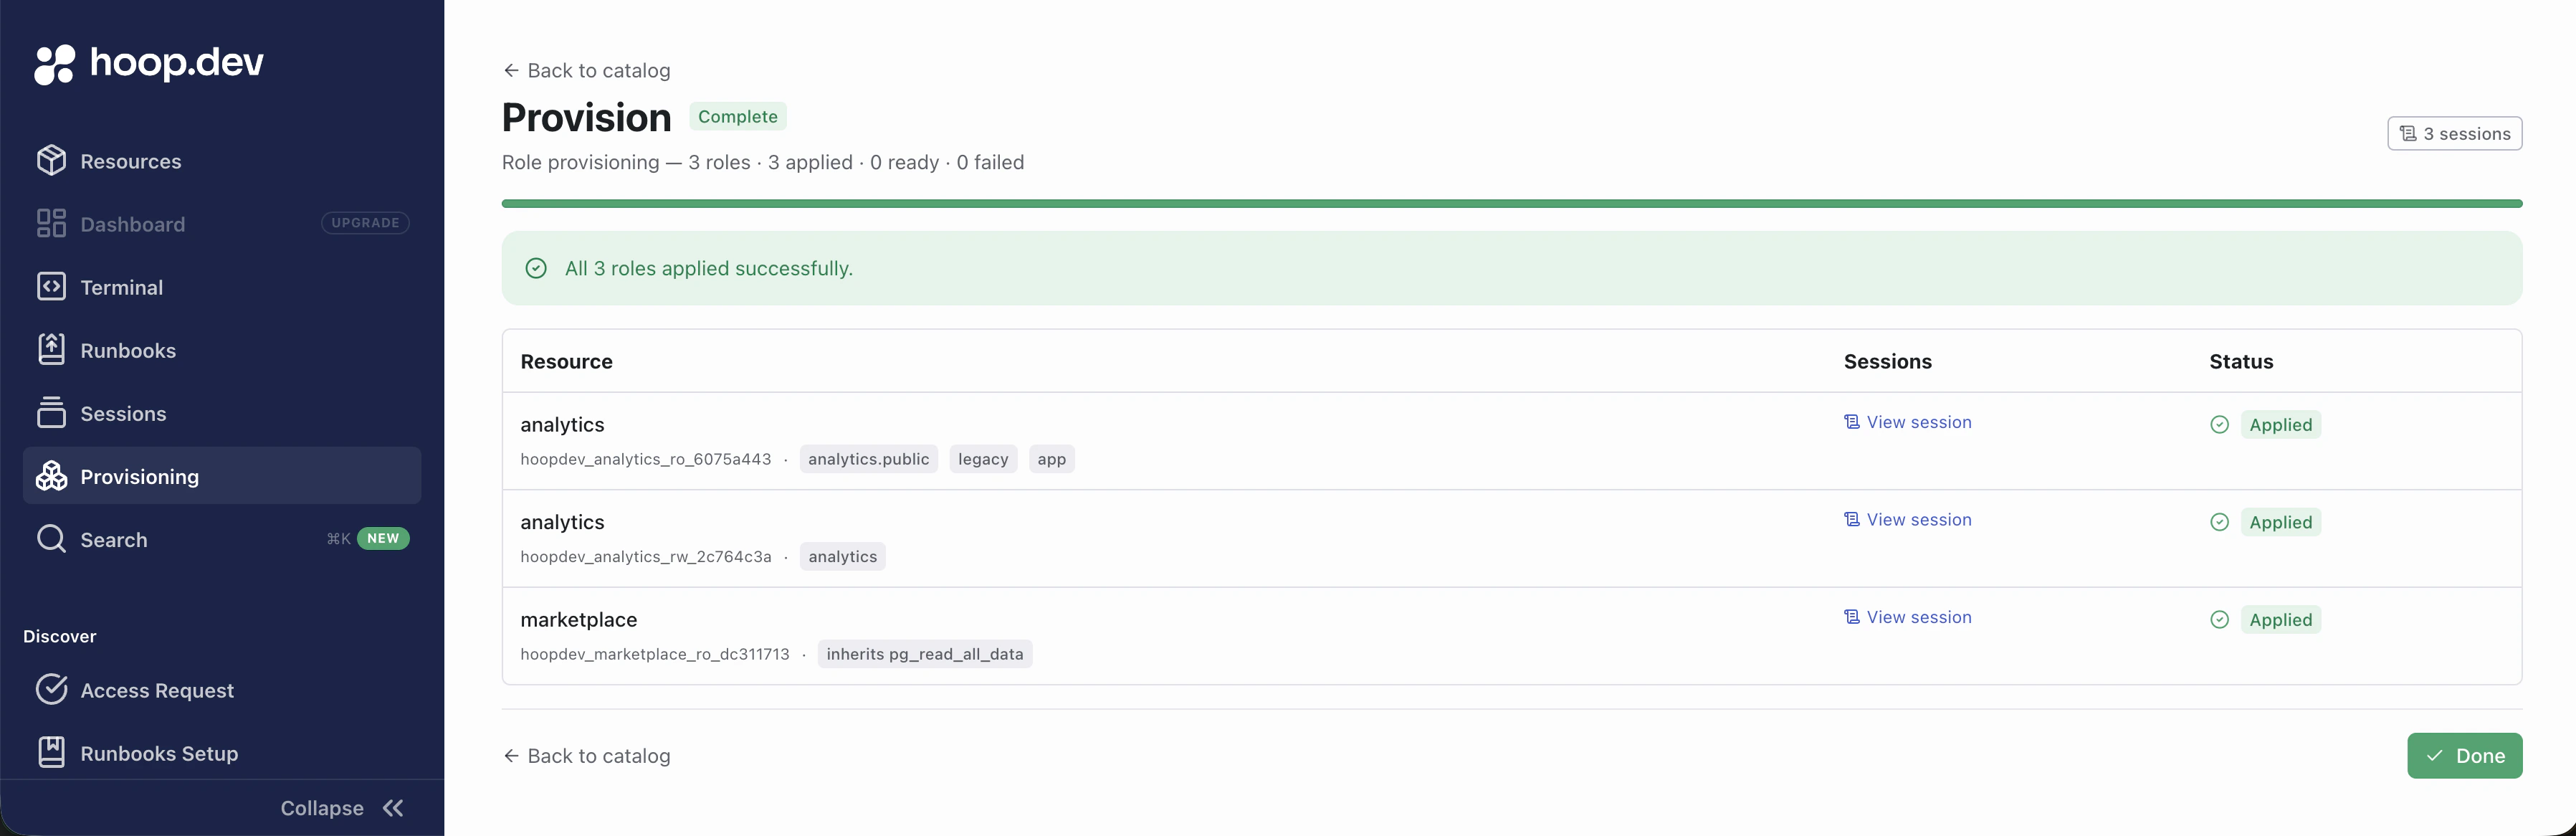
Provision screen showing all 3 roles applied successfully
On completion, every role shows Applied status and the Inventory tab reflects the fully configured state.
Inventory tab with both resources showing 3/3 Configured

Audit Sessions

Every plan and apply step creates an administrative session that captures the full SQL output. Click View session on any role in the Provision view (or navigate to Sessions in the Provision tab) to inspect the raw output.
Session detail showing the YAML config and SQL output for the applied role
The session output contains several sections:
sid: 986e35ce-f3fc-4f79-b136-512eada7b850
config:
    type: managed
    role_name: hoopdev_analytics_ro_6075a443
    source_role: ""
    scopes:
        - analytics.public
        - legacy
        - app
    privileges:
        - SELECT
    rotate_password: false
current_state:
    role: hoopdev_analytics_ro_6075a443
    requires_migration: true
    exists: false
    attributes: {}
    memberships: []
    scope_states:
        analytics.public:
            bulk_privileges: []
            table_count: 1
            status: out-of-sync/unprovisioned
            exceptions:
                missing: {}
                extra: {}
        app.public:
            bulk_privileges: []
            table_count: 4
            status: out-of-sync/unprovisioned
            exceptions:
                missing: {}
                extra: {}
        legacy.public:
            bulk_privileges: []
            table_count: 1
            status: out-of-sync/unprovisioned
            exceptions:
                missing: {}
                extra: {}
sql_plan: |+
    -- =========================================================
    -- Role: hoopdev_analytics_ro_6075a443
    -- =========================================================

    -- Role does not exist yet; create it with the desired attributes.
    -- The password below is randomly generated — capture it before applying.
    CREATE ROLE "hoopdev_analytics_ro_6075a443" WITH PASSWORD 'ROLE_PASSWORD_PLACEHOLDER' INHERIT LOGIN;


    -- =========================================================
    -- Database: analytics
    -- =========================================================
    \connect "analytics"
    BEGIN;
    GRANT CONNECT ON DATABASE "analytics" TO "hoopdev_analytics_ro_6075a443";
    GRANT USAGE ON SCHEMA "public" TO "hoopdev_analytics_ro_6075a443";
    GRANT SELECT ON ALL TABLES IN SCHEMA "public" TO "hoopdev_analytics_ro_6075a443";
    COMMIT;


    -- =========================================================
    -- Database: app
    -- =========================================================
    \connect "app"
    BEGIN;
    GRANT CONNECT ON DATABASE "app" TO "hoopdev_analytics_ro_6075a443";
    GRANT USAGE ON SCHEMA "public" TO "hoopdev_analytics_ro_6075a443";
    GRANT SELECT ON ALL TABLES IN SCHEMA "public" TO "hoopdev_analytics_ro_6075a443";
    COMMIT;


    -- =========================================================
    -- Database: legacy
    -- =========================================================
    \connect "legacy"
    BEGIN;
    GRANT CONNECT ON DATABASE "legacy" TO "hoopdev_analytics_ro_6075a443";
    GRANT USAGE ON SCHEMA "public" TO "hoopdev_analytics_ro_6075a443";
    GRANT SELECT ON ALL TABLES IN SCHEMA "public" TO "hoopdev_analytics_ro_6075a443";
    COMMIT;

sql_plan_checksum: c6da4a8cc008b923114f8a0adcfa201b527b8e05536f4befd2373fe962647e71
command_output: ""
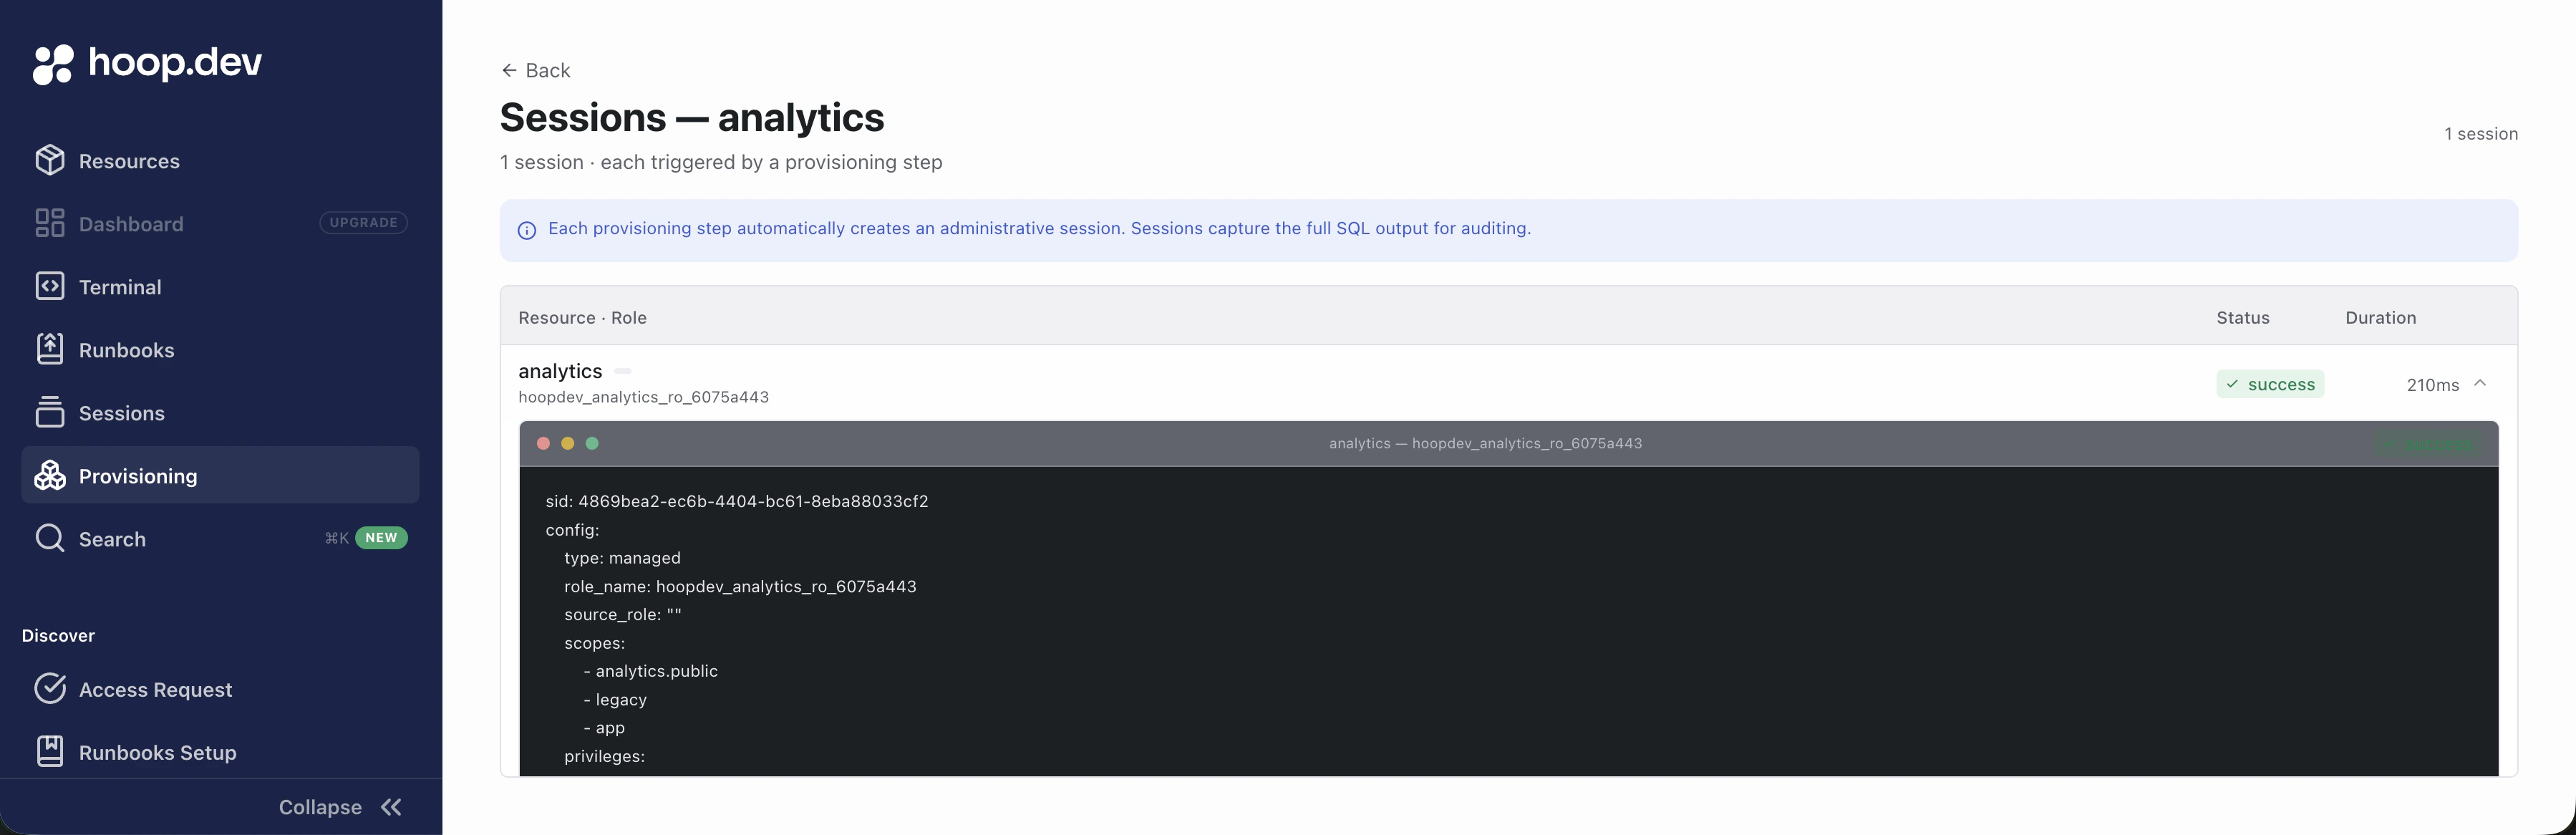
config — The role definition as submitted: type, target role name, scopes, privileges, and whether a password rotation was requested. current_state — A snapshot of the live Postgres cluster at plan time. exists: false means the role does not yet exist. Each scope entry shows how many tables were found and whether the scope is out-of-sync/unprovisioned (needs work) or in-sync (already correct). The requires_migration: true flag tells Hoop the plan must be applied. sql_plan — The exact SQL that will be executed on apply, organized per database. For a new managed role this includes CREATE ROLE with a randomly generated password, followed by GRANT CONNECT, GRANT USAGE ON SCHEMA, and GRANT SELECT ON ALL TABLES for each scope. sql_plan_checksum — A SHA-256 digest of the plan. Hoop re-computes this checksum at apply time and rejects the apply if the live Postgres state has drifted since the plan was run, preventing stale plans from being applied. Sessions are queryable in the Sessions page and are included in any connected SIEM or webhook export.

Managing via the CLI

All provisioning operations available in the Web App are also accessible from the hoop resources command group. This makes it straightforward to automate provisioning from CI pipelines or scripts.

Health Check

Test connectivity to a resource before running a plan:
hoop resources health analytics
hoop resources health analytics --json
Exits 0 and prints status: ok on success. On failure the agent error is returned.

Plan

Compute a dry-run SQL diff for a single resource:
hoop resources plan analytics \
  --role ro \
  --scopes analytics.public,legacy,app \
  --privileges SELECT
On success, the full plan YAML is printed to stdout (including current_state, sql_plan, and sql_plan_checksum). To save the result for a later apply, pipe it to a file with -o:
hoop resources plan analytics \
  --role ro \
  --scopes analytics.public,legacy,app \
  --privileges SELECT \
  -o result.yaml
For multiple resources at once, write a YAML plan file and pass it with -f:
hoop resources plan -f plan.yaml -o result.yaml
plan.yaml format:
items:
  - resource_name: analytics
    type: managed
    role: ro
    scopes:
      - analytics.public
      - legacy
      - app
    privileges:
      - SELECT

  - resource_name: analytics
    type: managed
    role: rw
    scopes:
      - analytics
    privileges:
      - SELECT
      - INSERT
      - UPDATE

  - resource_name: marketplace
    type: external
    role: ro
    source_role: pg_read_all_data
FlagDescription
--roleRole label (e.g. ro, rw) — required without -f
--typemanaged (default) or external
--scopesDatabase or database.schema scope — comma-separated or repeatable
--privilegesPostgres privileges — comma-separated or repeatable
--rotate-passwordForce password rotation on the next apply
-f <file>YAML plan file for batch operations
-o <file>Write plan results to a file (input for apply -f)
To inspect the output of an existing plan session:
hoop resources plan status <sid>

Apply

Apply a plan using the SID returned by plan:
hoop resources apply analytics --sid 986e35ce-f3fc-4f79-b136-512eada7b850
Apply all entries from a plan result file (only entries with out-of-sync status are sent to Postgres — already-in-sync entries are skipped automatically):
hoop resources apply -f result.yaml
FlagDescription
--sidSession ID of the plan to apply — required without -f
-f <file>Plan result file from plan -o

Full CI Workflow

# 1. Plan
hoop resources plan -f plan.yaml -o result.yaml

# 2. Review result.yaml — inspect SQL and checksums

# 3. Apply
hoop resources apply -f result.yaml
Hoop re-verifies the plan checksum against live Postgres state at apply time. If the cluster has changed since the plan was run, the apply is rejected and a fresh plan must be produced.