Automating JIRA Service Desk with Hoop APIs

Setting up automations in JIRA Service Desk can save time and streamline workflows, especially when integrating external services like Hoop. This guide will show you how to create automations that use Hoop’s API, allowing for smooth communication between JIRA and Hoop. Each rule will handle specific steps in the workflow, such as session creation, execution, and status updates.
Prerequisites
- JIRA Service Desk with admin access.
- Hoop API access, including an authorization token.
- Custom Fields in JIRA:
Script,Connection,Hoop Review ID, andHoop Session ID.
These fields will allow the automation to pull and push relevant data between JIRA and Hoop.
Step 1: Setting Up Custom Fields
First, create the following custom fields in JIRA:
- Script: A text field that stores script details.
- Connection: A text field that holds connection information.
- Hoop Review ID: Stores the review identifier from Hoop.
- Hoop Session ID: Stores the session identifier from Hoop.
These fields will be referenced in each automation rule to enable data transfer between JIRA and Hoop.
Step 2: Creating Automation Rules
Let's walk through the setup of four different automation rules that interact with Hoop’s API for creating sessions, executing them, and updating their status based on approvals or rejections.
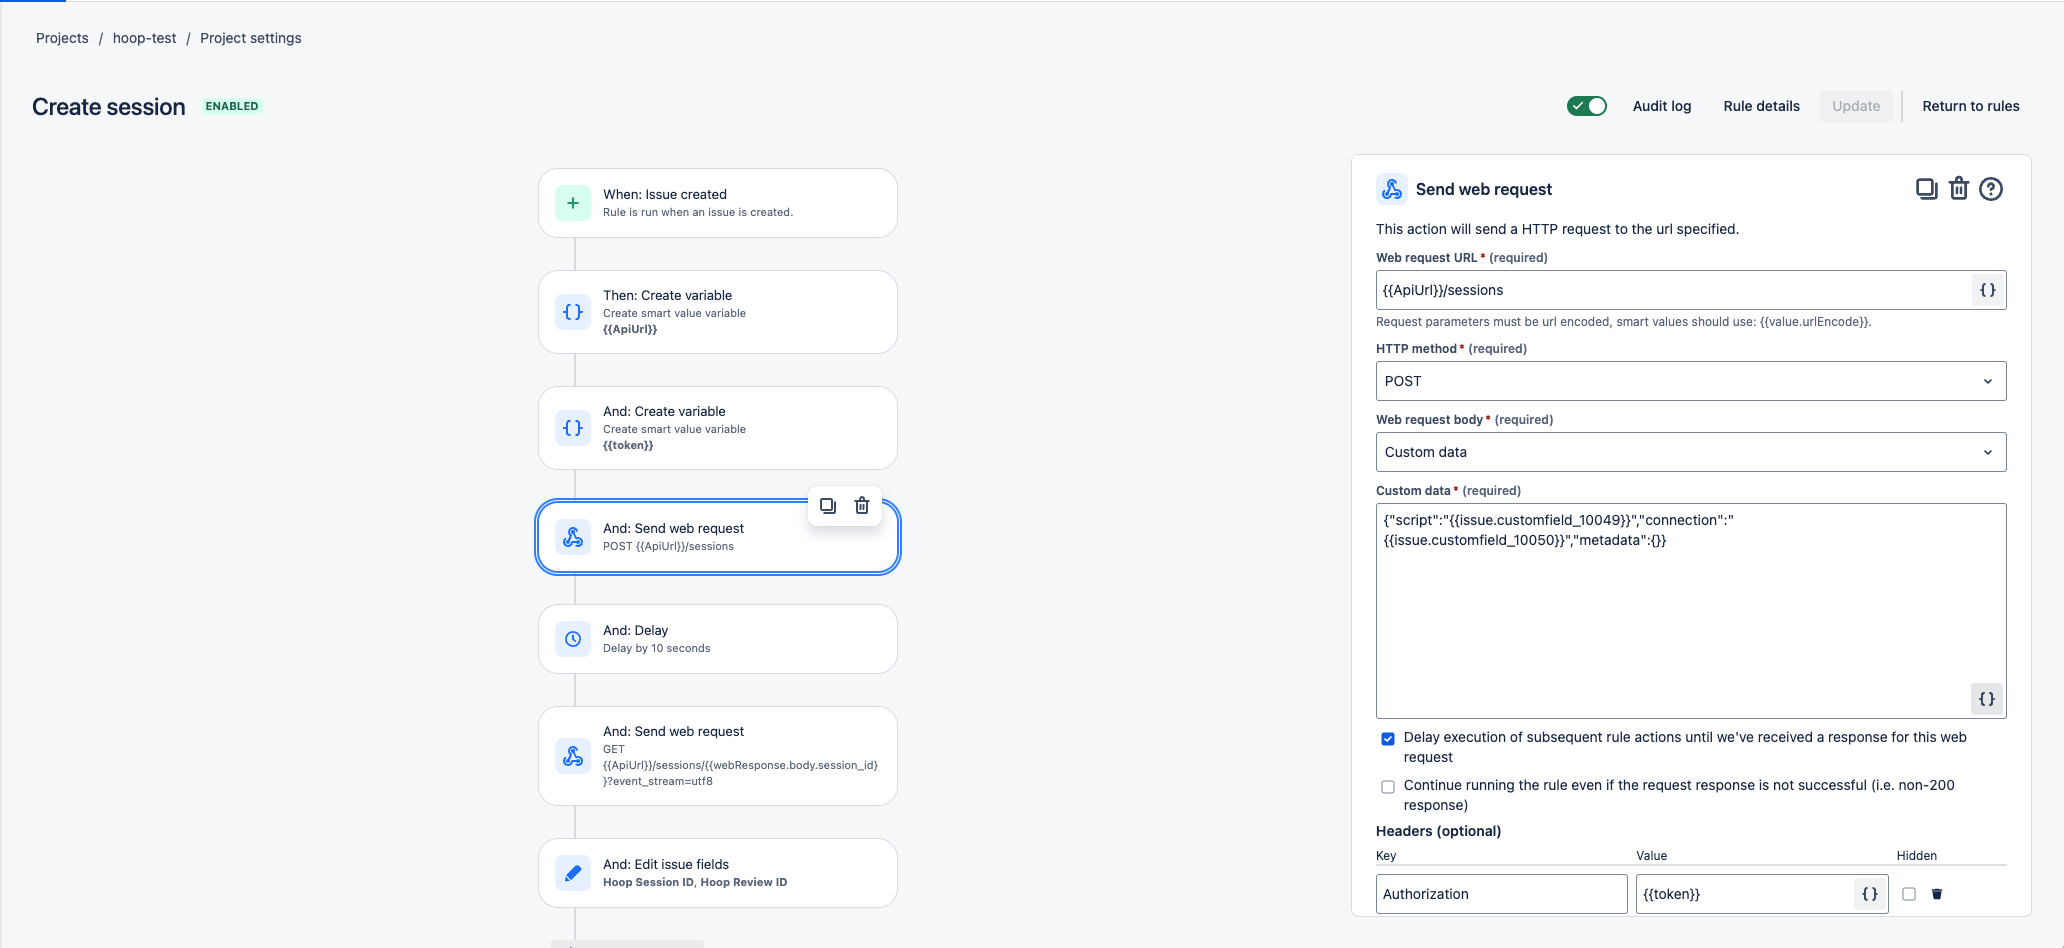
Rule 1: Creating a New Session in Hoop
This rule creates a session in Hoop when a new issue is created in JIRA.
Trigger: Set the rule to trigger when a new issue is created in JIRA.
Actions:
- Create Variables:
ApiUrl: Set tohttps://use.hoop.dev/api.Token: Set your Hoop API token for authorization.- Outgoing Webhook: Make a
POSTrequest to create a session in Hoop, using theScriptandConnectionfields.
{
  "url": "{{ApiUrl}}/sessions",
  "headers": [{"name": "Authorization", "value": "{{token}}"}],
  "customBody": "{\"script\": \"{{issue.customfield_10049}}\", \"connection\": \"{{issue.customfield_10050}}\", \"metadata\": {}}",
  "method": "POST"
}
This JSON request sends a POST request to {{ApiUrl}}/sessions to create a new session in Hoop. It includes Script and Connection data from the issue’s custom fields.
Wait Action: Add a 10-second pause to allow Hoop to process the request.
Retrieve Session Info: Send a GET request to retrieve session details.
{
  "url": "{{ApiUrl}}/sessions/{{webResponse.body.session_id}}",
  "headers": [{"name": "Authorization", "value": "{{token}}"}],
  "method": "GET"
}
Set Custom Fields: Update Hoop Session ID and Hoop Review ID based on the response.

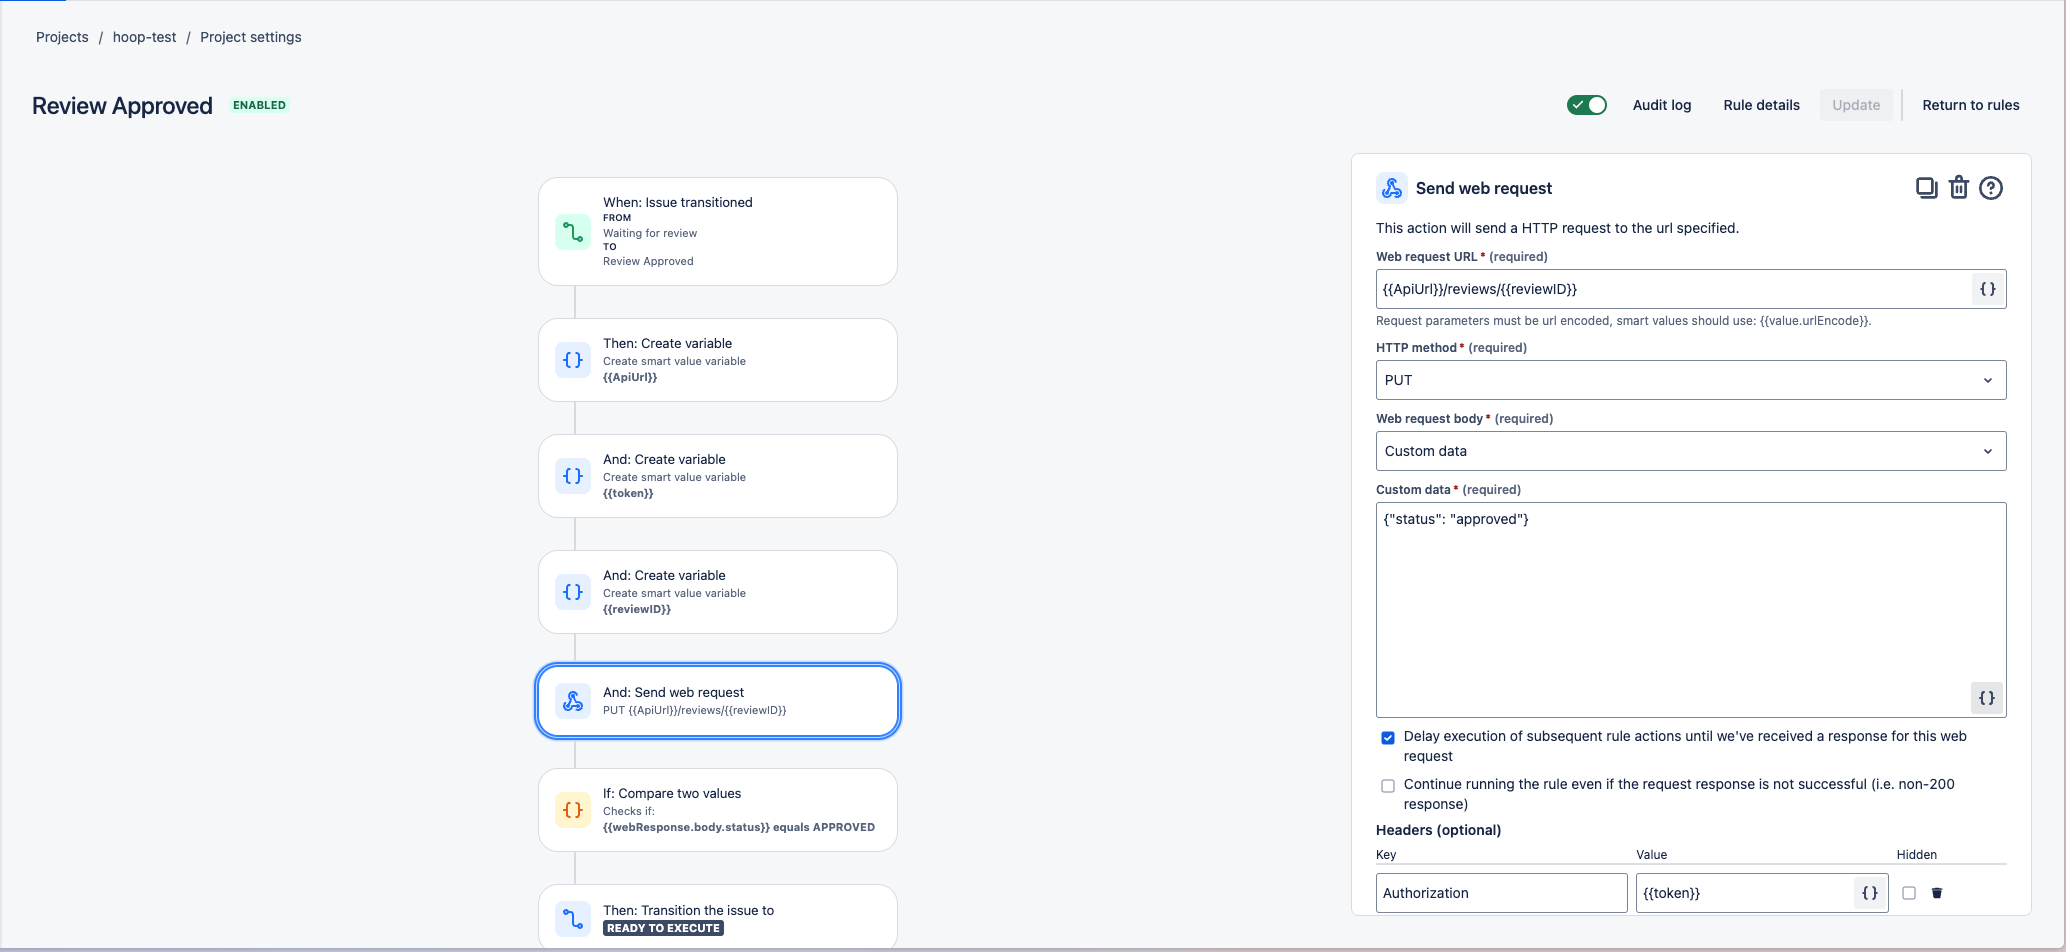
Rule 2: Marking Review as Approved
This rule updates the review status in Hoop to “approved” when an issue transitions to the “Review Approved” status.
Trigger: Set to activate when the issue status changes to “Review Approved.”
Actions:
- Create Variables for
ApiUrl,Token, andReviewID. - Outgoing Webhook: Send a
PUTrequest to update the review status.
{
  "url": "{{ApiUrl}}/reviews/{{reviewID}}",
  "headers": [{"name": "Authorization", "value": "{{token}}"}],
  "customBody": "{\"status\": \"approved\"}",
  "method": "PUT"
}
This JSON sends a PUT request to {{ApiUrl}}/reviews/{{reviewID}}, setting the status to "approved".
Condition: Check if the response status is "APPROVED."
Transition Issue: Move the issue to “Ready to Execute” if the condition is met.

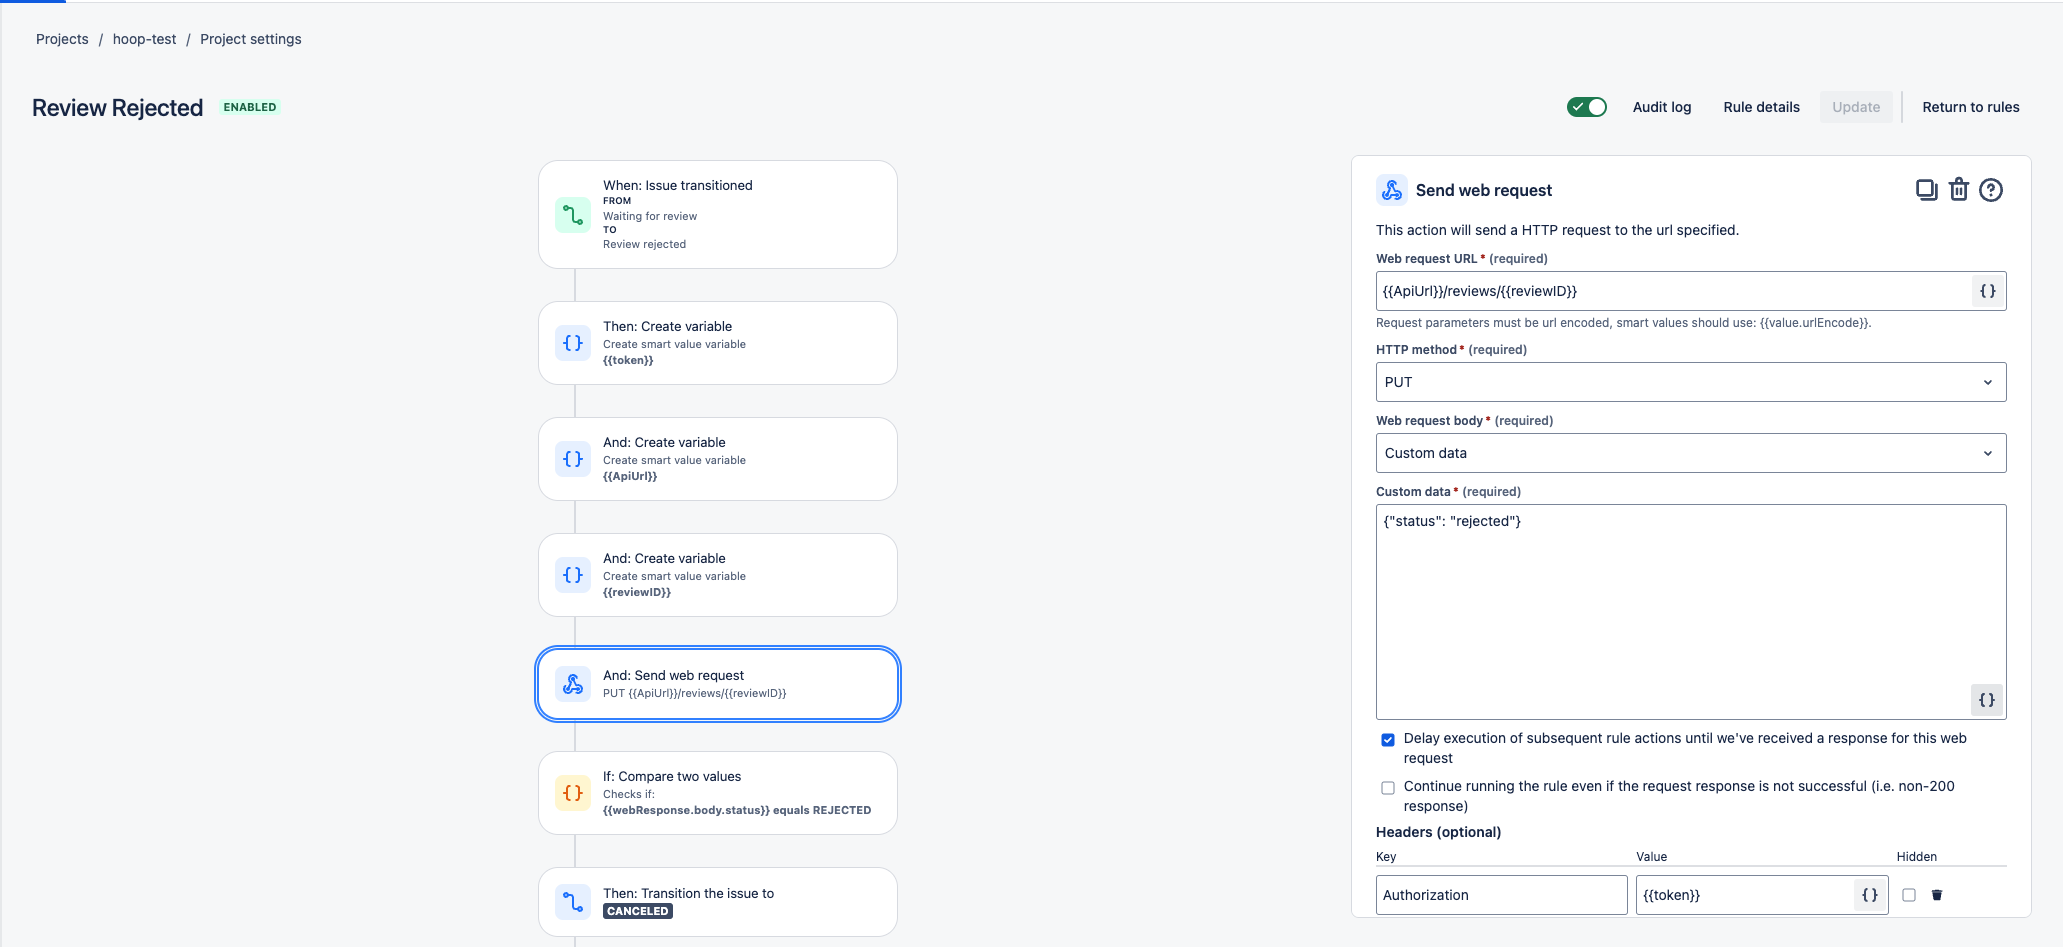
Rule 3: Marking Review as Rejected
This rule marks the review as “rejected” in Hoop if the issue transitions to the “Review Rejected” status.
Trigger: Set to activate when the issue status changes to “Review Rejected.”
Actions:
- Create Variables for
ApiUrl,Token, andReviewID. - Outgoing Webhook: Send a
PUTrequest to update the review status.
{
  "url": "{{ApiUrl}}/reviews/{{reviewID}}",
  "headers": [{"name": "Authorization", "value": "{{token}}"}],
  "customBody": "{\"status\": \"rejected\"}",
  "method": "PUT"
}
This JSON sends a PUT request to {{ApiUrl}}/reviews/{{reviewID}}, changing the status to "rejected".
Condition: Check if the response status is "REJECTED."
Transition Issue: Move the issue status to “Canceled” if the condition is met.

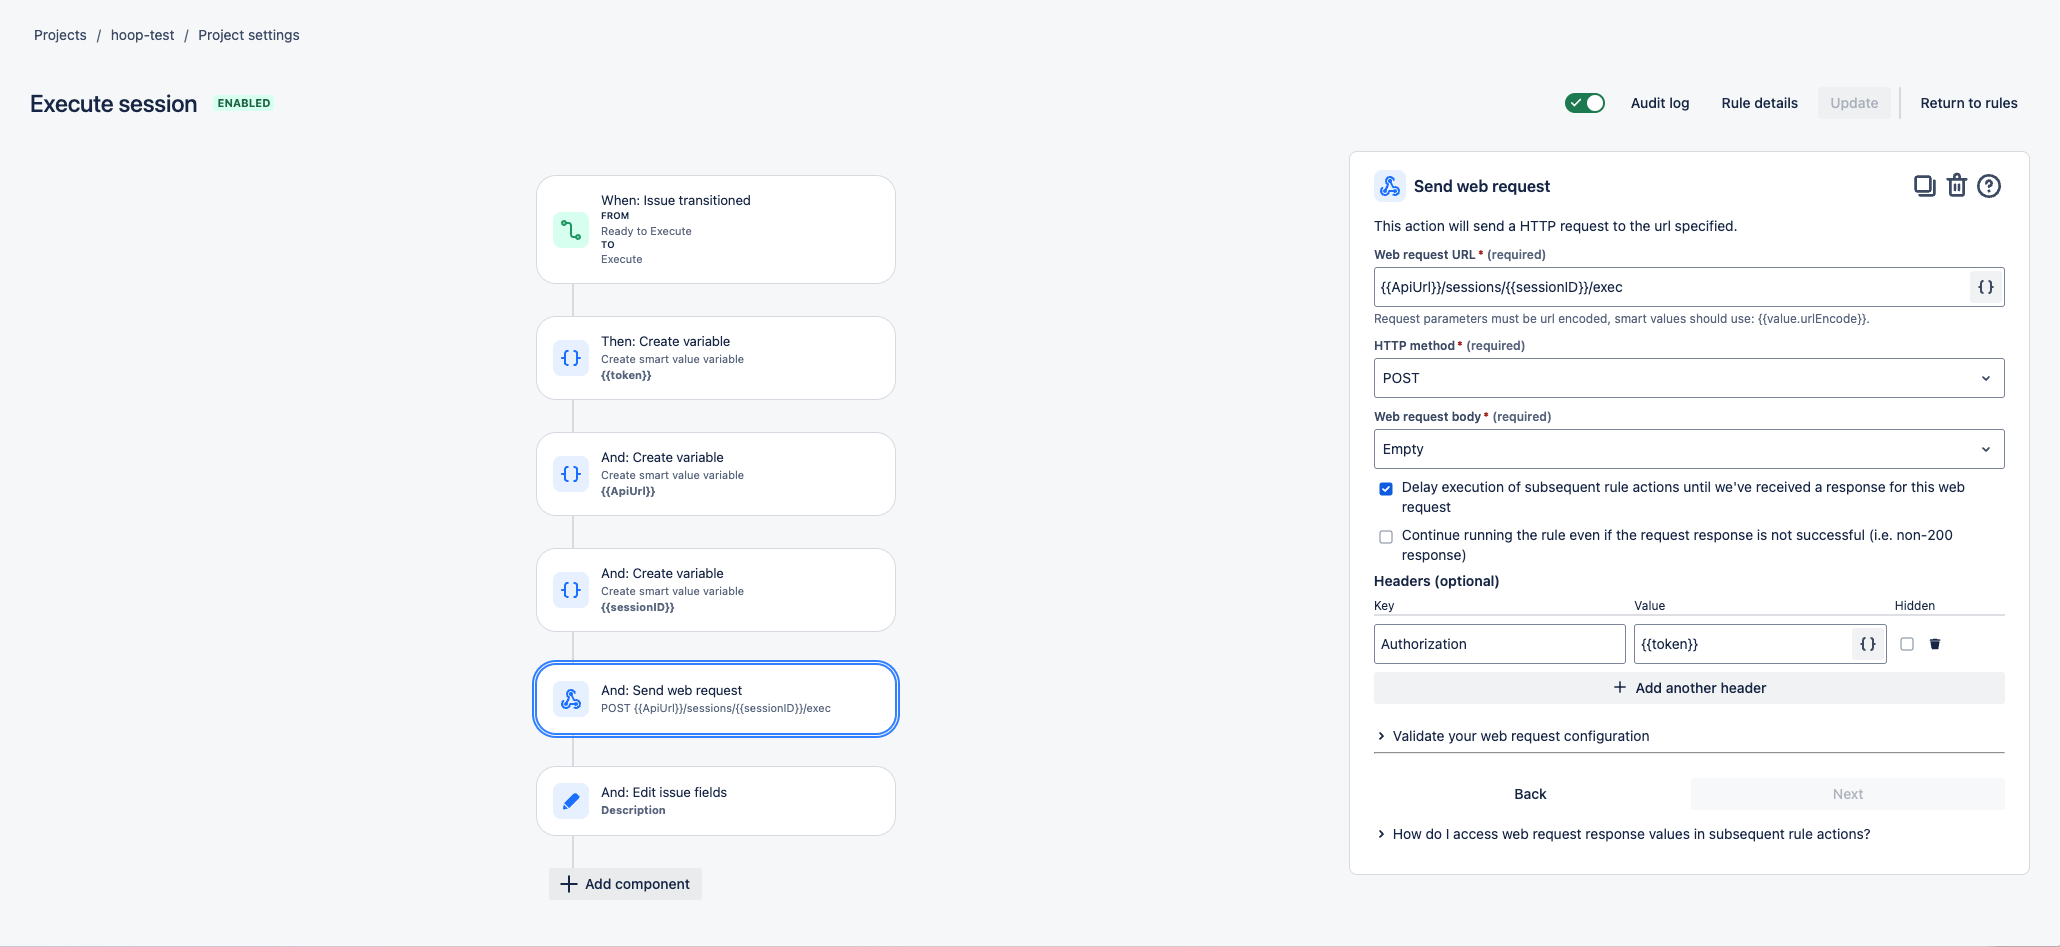
Rule 4: Executing a Session
This rule executes a Hoop session when the issue status changes to “Execute.”
Trigger: Set to activate when an issue transitions to the “Execute” status.
Actions:
- Create Variables for
ApiUrl,Token, andSessionID. - Outgoing Webhook: Send a
POSTrequest to execute the session.
{
  "url": "{{ApiUrl}}/sessions/{{sessionID}}/exec",
  "headers": [{"name": "Authorization", "value": "{{token}}"}],
  "method": "POST"
}
This JSON sends a POST request to {{ApiUrl}}/sessions/{{sessionID}}/exec to trigger the execution of a specific session in Hoop.
Update Description: Append the response from Hoop to the issue’s description field.

Conclusion
Following these steps, you can set up automation rules that integrate the JIRA Service Desk with Hoop, reducing manual tasks and improving workflow consistency. These automations enable seamless platform updates and transitions, keeping everyone in sync.
